Really, there is no other way to put it.(For reference, it's easily twice as big as the last pics of it in my last garden picture post.) I bought some romaine at the store to make some salad for tonight, and though I'd 'supplement' with some of our lettuce from our container garden. I clipped off a few of the lower leaves. Didn't make much of a dent in the lettuce heads. But after I washed and ripped it into the bowl, it filled half of a huge popcorn bowl. Wow! At this rate, I'm hoping we can have 1-2 salads a week from our lettuce! The spinach is also suddenly huge. We have been having hot weather, finally, so that's probably why. Although nothing else is growing quite so fast, not even the radishes!
Today I dressed Ryleigh, my 2 year old, in a cute little top I crocheted for her. I meant to get pictures to post on here, but wouldn't you know it, before I could she got all wet from our little blow-up pool. She wasn't in it, but was leaning on the side to fill up a little container, that she then proceeded to water plants with. LOL, she's been watching me I guess. My little gardener.
Sunday, June 14, 2009

Wednesday, June 10, 2009
I'm totally LOL'ing here.
My last post, I had started as a draft. On May 19. I erased it all, and re-wrote a new one last night, but when I published it, the date still says May 19! LOL. I have NO idea how to change it. Oh well! I find blogger to make things very difficult to format things the way I like it. I'm having picture problems as well.
BTW - Nice warm day today! Noticed flower buds on the pepper plant! woohoo!!
I know, warm is a relative term. 23 Celcius or 74 Farenheit is what it is at the moment. That's probably 'cool' to some of you. Especially since our humidity is only at 23%. But after a long winter, it's nice and warm to me. Now if only our night temps would stop dropping so close to freezing.......
My last post, I had started as a draft. On May 19. I erased it all, and re-wrote a new one last night, but when I published it, the date still says May 19! LOL. I have NO idea how to change it. Oh well! I find blogger to make things very difficult to format things the way I like it. I'm having picture problems as well.
BTW - Nice warm day today! Noticed flower buds on the pepper plant! woohoo!!
I know, warm is a relative term. 23 Celcius or 74 Farenheit is what it is at the moment. That's probably 'cool' to some of you. Especially since our humidity is only at 23%. But after a long winter, it's nice and warm to me. Now if only our night temps would stop dropping so close to freezing.......
Tuesday, May 19, 2009
What I've been up to.

This was the inside of my house a few weeks ago. The very beginnings of my container garden. I was so excited. Would you believe the very day after I planted everything, we had 2 inches or so of SNOW?
Yes, I live in the land of 80-something frost free days all year. That is why container gardening is so wonderful here - there are no worries about frost or snow. I just haul everything inside.
I must admit, though, that the tomatoes were a tad heavy.
Especially with the cozy-coats. Filled with water.
Jadyn, my 6 year old, helped me plant everything. We started with 2 tomato plants - 'ultra girl' and 'sweet millions'. The cherry tomato plant is Jadyn's choice and Shayda (my 8 year old) picked out the lettuce- both were bought at the local farmer's market. Here's what one of the plants looked like about 2 weeks ago:

And this is what they look like now:

You can see we added a third tomato plant - it's called 'sub-arctic plenty' and it is probably a perfect plant for our environment. It's more of a 'bush' type so probably won't get as big as the other 2. We also bought a 'tiny tim' cherry tomato plant, you can probably spot it in the other pics. It's so mini, yet it's already flowering.
Here you can see our very first tomato babies! Jadyn was so excited, and happy her plant is the first! lol. They all have flowers right now though.

The next 2 photos show the progression of our lettuce in about 2 weeks:


It's hard to see (Thanks to the shadows) but in the second one you can see some spinach (in the top container) and romaine (in the bottom one) beginning to grow too. I already harvested a few of the bottom lettuce leaves that had tip burn and cut off the brown parts and used them in a salad. So we're already eating from our 'garden'. lol.
And here are some more plants. I have pickling cukes in the round 'terracotta' pots, zucchini in the square pots, and a mix of romaine and spinach in the ice cream pails (hey, I was short of pots, lol!). The poor spinach today was turned upside down by the dog on the deck, so only one seedling remains. I've re-seeded the pot. *sigh*. Our 2-year old golden/lab/mutt mix would give Marley a run for his money. Anyday.

I also purchased a pepper plant. It seems to be doing okay, despite the cool temps. We get tons of sunlight this far up north, so that seems to help. WE also are attempting to grow radishes in the yogurt containers, lol! We'll see how that works out. The pansies in the itty bitty pots are struggling, but aforementioned dog is to blame for that. Those itty bitty yogurt pots are tipped over every other day, I'm sure.

I'm still debating over whether or not I should get more tomatoes. I'd also like to get one more sweet pepper plant and one hot pepper plant. I SO want to make my own salsa. I do have cilantro growing, but it's pretty slow going so far.
And, once again, tonight, I will have to cover up the plants because of possible frost. 4 days past our frost free date. This spring has been awful and cold and LATE. I hope summer is better!
Saturday, May 9, 2009
Spur of the moment crafting.
Last night I was watching TV. I'm the type of person who cannot stand having idle hands, and need to have something to do while I'm doing something. Yeah, I realize that doesn't make much sense. Basically, if I'm doing something with my hands, I must have mental stimulation and if I'm doing something mentally stimulating, my hands need do be doing something. Which is why I love the computer so much. Typing keeps my hands busy and reading keeps my brain busy.
Okay, probably TMI for a craft blog....
anyhoo....
Here's the product of my tv watching last night:

Bling bling! Making beaded barrettes is a lot of fun, and so easy and they are so pretty and sparkly at the end. Pictures never do them justice. There really is no way to photograph the sparkle (unless you have a cool filter, or you add fake stars in photoshop).
This first one was made to match Gymboree's Pretty Lady line:
 I made it with 4 colors of Swarovski crystals. I like that it also matches a few other outfits the girls have.
This next one is for Jungle Gem. This was my first time doing this araingement of alternating cat's eye beads and Swarovski crystals. It looks really neat.

I did the same thing for this one:
 Except instead of using all different colors, I used matching crystals and beads. I made it to match the old Sunflower Fields line that my 2 yo has inherited. She, like her older sister before her, doesn't care for the matching headband. This will be easier to keep in on her.
 One thing I like so much about these is that my older girls will wear them. When I make bows, it's for the younger 2 girls. But with these barrettes, all my girls can wear them, which makes me happy. Look for more posts about these in the near future if my crystal stash holds out.
Friday, May 8, 2009
Bows, bows and more bows!
 Ah. Bows. They are so darn cute on my itty bitty girlie. I've been spending the last few days making some in my free time. Thanks to Granny, the girls got some new outfits and I've been wanting some hair accessories to go with them. I love how the hair pretties often make the outfit. It's really too cute. I love the look.
I started bow making about 4 years ago. I bought a dvd after not being able to find any free instructions online. The dvd was ok, but way too basic. I enjoyed doing korkers the most, but wasn't impressed with how my (at the time) 2 year old could pull them apart.
So I eventually asked at a messageboard what were some good instructions and ended up getting TOTT (Tricks of the Trade) instructions off of Ebay. (You can also get them at YCMT or The Ribbon Retreat) They were extremely helpful, especially the videos. Ever since, I've enjoyed the tons of combinations I've been able to make. Some types I'm better at than others (you'll see later on in this post). I've been tempted to try other types of instructions, but really, so far TOTT has satisfied most of my bow needs.
I'm missing a few colors I need, especially for the Jungle Gem Gymboree line, I had to make do for now. I have no money in my paypal account at the moment, so it might be awhile before I get to make something to match that outfit. In the meantime, I purchased 'make your own ribbon' graphics from The Fairy Pixel for that line. You can see, further down in the post, how that turned out.
 The zebra print bows are to match both Mod Zebra and Wild One Gymboree lines. They are my favorites, and they are the ones that turned out the best. Unfortunately they are the ones I didn't get a good picture of. Try taking a good picture of bows in a hyper 2 year old's hair. So the picture is a bit out of focus.
I also made these:
 for the days we don't feel like bows or piggies or pony tails. These are no-slip clips. Perfect for holding back her wispy hair in front. She's been wearing no-slip clips since she was 4 months old. I love them.
Here are the 'oops' bows of the day:
 They aren't quite as crooked as they look. (LOL yes I'm telling the truth) but they are a bit. For some reason, they came out the same - both are smaller on the same side. Strange. Definitely need more practice with that fold!! I also found it hard with these, and the giraffe print ones - I used the large ribbon size (1.5) for the knot. Let's just say I don't like doing it because it rarely works well, but I really wanted the middle to match and didn't have the matching 3/8.
These are the 'tails down' ones. I actually made them with no particular outfit in mind. These are symmetrical, but hard to tell here:

I love lavender. I remember when I first started making bows, it was impossible to find a nice lavender ribbon. Now RABOM carries this gorgeous color:
 The giraffe prints are probably the biggest bows I've made in awhile. They are gorgeously poufy. I wish I'd have bought the 3/8" matching ribbon when I bought the 1.5". I wasn't thinking then, I guess. The middle knot was HARD with a big ribbon and thick bow.
These are SO cute with the TCP outfit I made them to go with. They match perfectly! I'll have to put a picture up of her with them both on.

The aqua bows, as well as the lavender, are really my absolute favorite style. It's easy to do, plus very frilly looking, and always comes out symmetrical. I did the same basic style with the TCP bows too, except I added a layer of spikes. If I ever consider selling bows, that would be the style I'd be most comfortable doing.
I just need to learn how to photograph bows better. I don't think I've ever gotten them to look as great in photos as the other bow makers do. I've thought about trying fabric stiffener, but I'm too scared to mess it up!
Okay, I'm so excited about this next thing: Make your own ribbon from The Fairy Pixel!!! This is seriously the coolest thing ever for someone like me. Being in Canada it's harder sometimes to get craft supplies to match things the best way (and I LOVE matching things exactly) but this way of making ribbon makes it match the Gymboree lines perfectly and all I need is readily available where I live. This was my first attempt:
 Aren't the monkeys cute???? The only problem I had was that my 3/8 ribbon was too small for the 3/8 print, (I'll have to email and ask about that) so I used 5/8. Love how the 7/8 turned out. I also am no longer able to deny what I have suspected for so long....my iron doesn't get hot enough. The instructions for the transfer paper say 10-20 seconds. I literally pressed for a minute and it still didn't work every time. grrr. I knew when that darn iron was dropped and had a few pieces fall off it, it was probably not the same after. I can tell when I'm sewing too. *sigh* time to get a new one.
There's always a chance, too, that it was the transfer paper. I might try a different brand, but seriously, an iron is practially cheaper than the paper is.
I can't wait to try more of those 'make your own ribbon' ribbons. I also have more bows in the works, but not sure how quickly it will all come together. I'll have to show the end product of the new monkey ribbon!
Well the girls are back from the Hannah Montana movie so I must go!
Friday, April 24, 2009
Pretty, frilly, fairy pants.

Aren't these cute? (if I do say so myself...) I made these using this pattern. I love YCMT.
I made a boo-boo (see how the ruffle falls a bit on the one leg...) but you can't tell when they are on. I made a size 1 and they fit Ryleigh, my 2 yo, perfectly. I can't wait until it's warm enough for her to wear them!
Edited to add: My dd wearing her new pants!!!!

Thursday, April 23, 2009
Baking - 2 out of 4 ain't bad.
So the other day I went on a baking binge. First I made, what I call 'healthy cookies' but the recipe my mom gave me says 'Chewy Granola Cookies'. They *sound* like they would be too healthy and granola-y, but they aren't at all. Check out the yumminess: 
I made the dough using the bread machine. I love doing that. Then I can bake other things (cookies!) in between.

 In the words of Pioneer Woman: "Eat. Faint."

 It still tasted good. I think we just didn't put enough hard chocolate in, and too much sweetened condensed milk (I was trying to convert ml into cups. Ooops). Ah well. It was fun.
Here's the recipe (how I made them, feel free to sub in other healthy additions):
Chewy Granola Cookies
- 1-1/2 cups all purpose flour
- 3 cups rolled oats
- 1 cup wheat germ
- 1 tsp baking powder
- 1/2 tsp salt
- 1 cup vegetable oil
- 1/4 cup brown sugar
- 1/2 cup honey
- 1-1/2 tsp vanilla
- 2 eggs
- 1/2 cup chopped almonds
- 1/4 cup sesame seeds
- 1/4 cup sunflower seeds
- 1 cup chocolate chips (I *may* have added a little more, lol).
In medium bowl combine flour, oats, wheat germ, baking powder and salt: Mix well. In large bowl, beat brown sugar, oil and honey until light and fluffy. Add vanilla and eggs; blend well. Add flour mixture and mix well. Stir in remaining ingredients. Drop dough by rounded teaspoonfuls, 2 inches apart onto greased cookie sheet. Bake in preheated 375 degree oven for 7-8 minutes.
yum! You can sub the all purpose flour with whole wheat, or sub the oil with butter, or the wheat germ with wheat or oat bran. I try not to go too overboard with the 'healthy' or the kids won't touch them. Making them with the chocolate chips though means these disappear. Fast. Oh, and a note of caution: if you make them with wheat bran and aren't used to the whole bran thing, don't eat more than a few at a time. IYKWIM. Dh has BTDT.
Next up:
Cinnamon buns!! (drool)
I made the dough using the bread machine. I love doing that. Then I can bake other things (cookies!) in between.
Cinnamon bun dough recipe:
- 1 cup milk
- 1beaten egg
- 4 TBSP melted butter
- 4 TBSP water
- 1/2 box INSTANT vanilla pudding
- 4 cups flour
- 1 TBSP sugar
- 1/2 tsp salt
- 2-1/2 tsp bread machine yeast
Put the liquid ingredients in your bread machine first, then add the dry ingredients, except the yeast. Make a well in the dry ingredients then add the yeast in the well. Select the dough cycle & press start.
My machine then gives me 1.5 hours to kill. :)
When the dough cycle is done, it is time to punch down the dough and roll it out into a rectangle. (just do your best, I can never get it just right).
Now is time to add the filling!
This time, I melted 1/4 cup of butter, spread it out over the dough rectangle. Then I combined 1/2 cup brown sugar and 1/2 cup white sugar and about 2 tsp cinnamon in a bowl and sprinkled it over the butter. There is another filling recipe I used to use, where you mix the butter in with the sugar and cinnamon and spread it out, but I found it to be too hard to spread evenly, so I'd increase the amount, then there would be too much filling. So I tried this (spread butter THEN sprinke sugar) other way and it worked out beautifully! Roll up from the wide end. Place in greased pans.
Normally I used my glass pans, but they were holding leftovers in the fridge. Hence the really ugly looking ones lined w/wax paper.
mmmmmmmmmmmmmmmmmmmmmm
Let rise till double in size - if you do this in a warm spot, it'll take less time. For me, out of the oven takes about an hour. If I turn the oven on for just a bit, then open the door until it's just 'warm' inside. I put the tray in and leave the door open just a crack. It takes about half an hour that way.
After your buns have grown (haha, they will after these yummy treats) take them out of the oven (if that's where you had them) and preheat the oven to 350 degrees. Then bake for 15-20 minutes. ahhhhhhhh, that aroma.
While the buns are baking, assemble the ingredients for the glaze:
- 1 cup icing sugar
- 1/2 tsp vanilla
- 1-2 TBSP milk or cream
Got it:
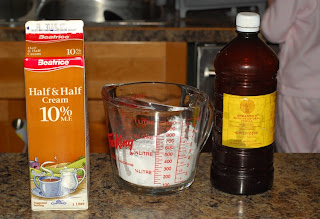
Mix together:

When the buns come out of the oven (teehee), drizzle the sweet goodness all over them.
In the words of Pioneer Woman: "Eat. Faint."I started this next tasty bread by soaking raisins overnight in boiling water:
Here are my girls playing with the cans this bread will be baked in:


Ready to go in the oven:

Voila, Hobo bread.
Unfortunately I messed up. It still tasted good, it's just a little, um, chewy. It was my first time making it. I didn't read the recipe closely enough. That's what I get for trying to bake too many things at once.
Shayda, my 8 yo, wanted to make something too, so I helped her make this fudge from a Strawberry Shortcake cookbook. It sure looked good going into the fridge.
But it didn't come out quite as firm as it should have been:
It still tasted good. I think we just didn't put enough hard chocolate in, and too much sweetened condensed milk (I was trying to convert ml into cups. Ooops). Ah well. It was fun.Next time I'll shoot for at least 3 out of 4. LOL.
Subscribe to:
Posts (Atom)


